Integrating ClearCRM with Seleqt is the easiest way to keep your sales pipeline perfectly up to date. Once connected, you can instantly push your Seleqt leads directly into your CRM, complete with their entire campaign history—including emails sent, opens, and replies!
Here is how to set up your integration in just a few simple steps.
In your Seleqt dashboard, navigate to Settings in the bottom left corner.
Click on the Integrations tab.
Locate the ClearCRM box and click the orange Connect button.
You will see two empty fields: ClearCRM subdomain and API Token.
Your subdomain is simply the first part of the web address you use to log into ClearCRM. For example, if your login URL is google.clearcrm.com, your subdomain is just google. Type your specific subdomain into the first box in Seleqt.
Leave your Seleqt tab open and open your ClearCRM account in a new tab to grab your token.
In ClearCRM's left-hand menu, click on Integrations and select API Management.
Click the blue + New Token User button at the top.
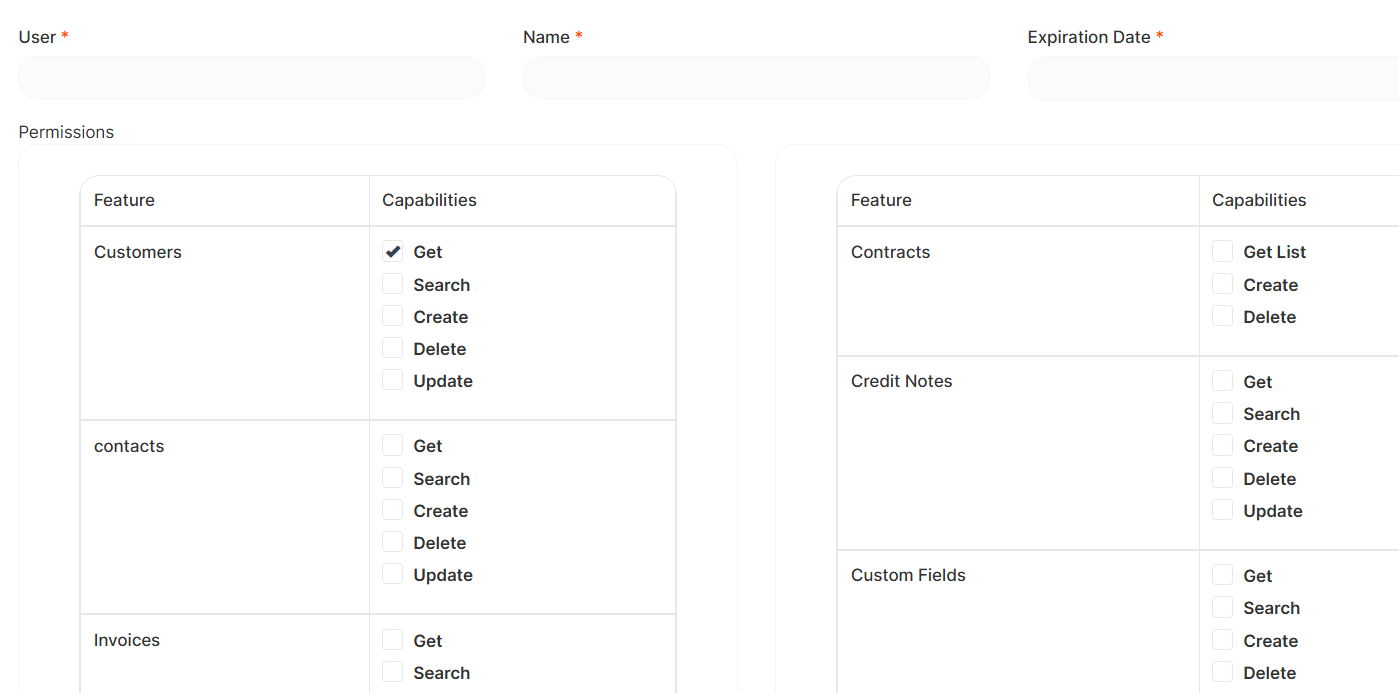
Fill out the basic details: add a User (like your email address), a Name, and select an Expiration Date for the token.
Set Permissions: Scroll through the permissions list. You need to grant access by checking the boxes (Get, Search, Create, Delete, Update) specifically for Products, Leads, and Tasks.
Click Save at the bottom.
ClearCRM will generate a long password string. Click the copy icon next to it, go back to Seleqt, and paste it into the API Token field.
Click Save and connect!
Now you need to tell Seleqt exactly where to put your data inside ClearCRM.
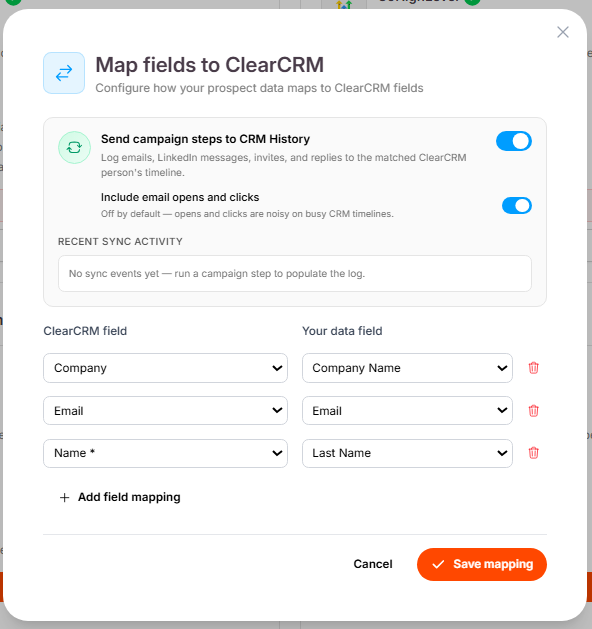
Sync Campaign History: Toggle on Send campaign steps to CRM History and Include email opens and clicks. This is a game-changer! It automatically logs your outreach actions straight into the lead's activity feed in ClearCRM.
Map Your Fields: Below the toggles, match your ClearCRM fields on the left to your Seleqt fields on the right (e.g., match "Name" to "First Name" and "Email" to "Email").
Add Extras: Click + Add field mapping to sync additional data, like matching the "Company" field to "Company Name" or "City" to "Company Location."
When you are finished matching, click Save mapping.
You are officially connected! Let's send a batch of leads over to your CRM to see it in action.
Open any of your active campaigns in Seleqt.
Go to your Leads tab and check the boxes next to the prospects you want to push.
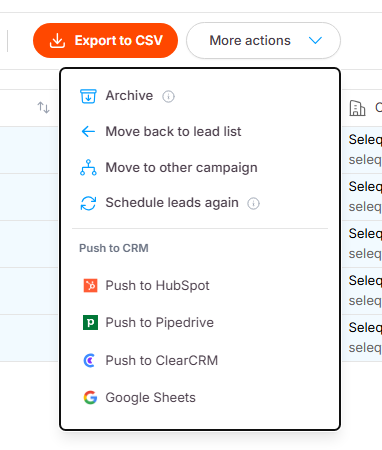
Click the More actions dropdown menu at the top of the list.
Select Push to ClearCRM.
You will see a green success message appear. If you hop over to your ClearCRM account and navigate to CRM > Leads, you will see your freshly synced prospects waiting for you. Clicking on any of those leads will show you their full contact info and Seleqt activity log!
You're all synced up! 🤝 By automating your data entry, you can spend less time switching between tabs and more time actually closing deals with your best prospects.
If you ever need to adjust your mapped fields or update your settings, simply head back to the Integrations tab at any time. Now go ahead, push your first batch of leads, and watch your pipeline grow! 📈✨